I've had a lot of people ask me how I did my counters. So I decided show everyone how I did it :-)
Here is the before shot:
Plain and ugly! I really had nothing to lose. I came across the blog prettylittleposies, and saw them paint granite with toll paints. I decided to go for it! I changed it up a little from what they did, so here goes.
Go to a hardware store and collect some granite samples. This helped me get an idea of the colors I wanted and also the pattern to paint.
Here are the supplies I used:
Foam roller - (Home Depot)
Recollections glitter - very fine (Michaels)
Recollections mica and ice flakes (Michaels)
Stipple brush
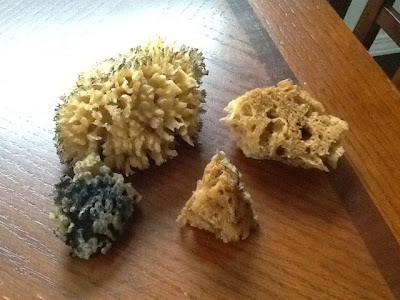
Sea sponges (Michaels)
Primer (Home Depot)
Sander/ sandpaper
Polyurethane topcoat - oil based will yellow your colors! Water based with give an orange peel texture. I used a combo of both. (Home Depot)
Step 1: scrub and clean your counters! I used scrubbing bubbles and scrubbed the heck out of them!
Step 2: sand down your countertop. I used a fairly heavy grit sandpaper. I did a lot of sanding with this project, so it helps to have an electric sander. Wipe down your counter once you're finished to remove any dust. Let your counter dry.
Step 3: Prime your countertop. I used biser 1-2-3 water based primer, and rolled it on with a foam roller. Let dry. Mine was dry within 30 minutes.

Step 4: choose your base color. I chose a regular black toll paint, also rolled on with a foam roller. Let your base dry.
Step 5: this is when it gets fun. I enjoyed this part, however it took a LONG time. I bought a Martha Stewart sea sponge pack from the craft store.
 |
| White Pearl (Metallic), Rich Espresso(Metalic), Champagne Gold (Metallic), Black, Vanilla, Suede, and Espresso |
It came with 4 sponges. I began dabbing my paints onto the counter. I used one color across the whole space, then picked a different color, and so on. I used all 4 sponges to get different patterns. The more random, the better it looks! Here is my first layer shown below:
Here is the second color:
And here is the final with all colors blended. Towards the end, instead of dabbing, I placed the sponge on the counter and rotated my whole hand to blend in all the colors. I used a champagne gold color over everything to really hide areas that looked too patterned. I spent a long time adding a little bit of this color here, and a little there. Just dab til you get it where you want! I used the stipple brush to get the colors into the corner areas where the sponge wouldn't reach.
Step 6: Next up, I used Recollections Mica and Ice flakes.
Step 7: Next up is to apply a topcoat. I used minwax polycrillic.
The polycrylic looks milky when you apply, but it dries clear. I used my foam roller to apply the finish. It dries quickly, so work fast. After the first layer, i poured some glitter in my hand and blew it over the whole counter. I might have gone a little crazy, but the glitter adds a lot! Once it's dry, you'll wait 2 hours sand, and re coat. I did two layers, and when I was finished, was left with an orange peel texture I wasn't thrilled about. I sanded the crap out of the counters and then applied a thin layer of minwax polyurethane (oil based) clear gloss to get the glass like finish. Remember it yellows, so if you do both, add a thin layer! I've also heard good things about varathane polyurethane for floors. Just research and choose the topcoat you think is best :)


No comments:
Post a Comment